
Pinspired By: Instagram iPhone Cover
9:00 AM
Who out there loves all the cute little square picture apps? Everyone? I thought so! I mean, what's not to love? At the top of my list of vintage square picture apps is Instagram. It's so fun to watch people's every day lives through photos. A little peak at what they're eating, wearing, doing, looking at, or just their favorite shade of lipstick because all they have is self portraits. Either way, I check my Instagram feed daily, and love adding to mine. I like how quick and effortless it is to share the little excitements in life; like painting a cats fingernails (her true name is Astird, like from the office. Not Bozo!),


Recently I've been thinking about how I can incorporate these fun little pictures into my daily life. So I turned to my beffy, Ms. Pinterest! While there are many cute ideas that I plan on using, this was the first one I tackled. It's sooo easy too, I was finished in less than a half hour. And it didn't cost me a thing.
Supplies:
Computer
Printer
Paper to print on (if you don't have a printer you could just send your picture to Target or wherever to get it printed)
Scissors
Craft Knife
Cutting Mat
Pencil
A clear case for your phone
Now, don't laugh. I created this in Word. From 1997. Soooo, yours might look a little different. So first up, set your margins to be the size of the phone, which is 2 1/4" by 4 1/2". That's the grey part of the little ruler guides on the top and left hand side. Once you have that set you need to copy and paste your images into your document. (you can do this straight from the interwebs. Just go to web.stagram.com and search for your username.)

Now that you have your picture in word, you need to reformat the picture. This makes it so you can move it around without making everything else move. Just right click on the picture, and select Format Picture. Once the box opens, select the Layout tab, then select Tight. Do this for all the pictures you copy and paste onto your word document.

Now that you have all your pictures reformatted you can start playing with the layout of your photo collage. Just make sure to keep an eye on your margins.
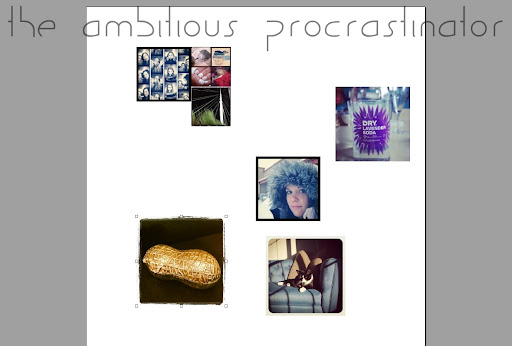
Like this.

Now that it meets your high standards, it's time to print. If it looks good, then it's time to get a little crafty.

I started by just cutting the picture out as a plain old rectangle. The I used a mechanical pencil with the lead part wound up to make a crease in the rounded corners. Follow along the crease with your scissors to get the corners nicely rounded. Don't worry if it isn't perfect, it may take a little tweaking here or there.
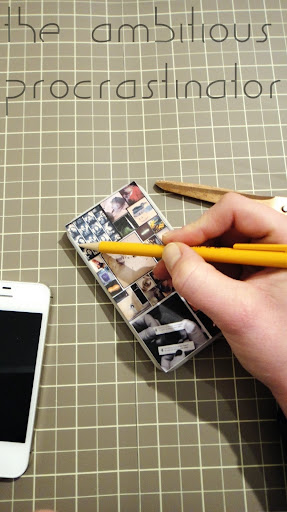
Now that the paper fits inside your case nicely, put your phone in the case because it time to cute the camera hole. Using the same pencil with the lead wound out, trace the opening in your case onto your collage.
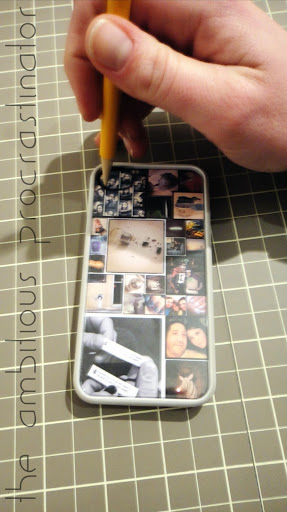
Take your phone and paper out of the case and use your craft knife to cut just outside of the camera hole you just traced.

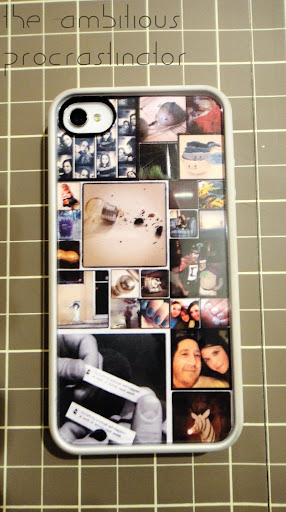
Put it all back together and you're done! That was easy peasy right? Now the back side of your iPhone is almost as interesting as the front side!
So, are you on Instagram? (Cause I wanna stalk you!) Do you like to paint your friend's cat's finger nails? (I do.) How many self portraits do you have on your feed? (I'm guilty of that 5 times.) Have you done any cute Instagram projects? I can't wait for Instagram to have a Droid app, the more the merrier!


3 comments
Thanks a lot for the share.... Thanks!
ReplyDeletecan u tell me how u measured that size correct
ReplyDeletewhat brand of case is that? this is awesome! thanks!
ReplyDeleteHi! I love comments, they're the best!